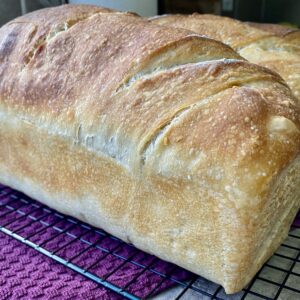
Sourdough Bread
Step-by-step instructions explaining how to make sourdough bread using a sourdough starter.
Ingredients
- 320 grams sourdough starter
- 630 grams lukewarm water
- 1020 grams flour
- 24 grams salt
Instructions
- First, prepare your starter days in advance. Make sure your starter is active. Discard will not work.
- Place a large mixing bowl on a food scale. ZERO out the food scale.
- Add your starter to the bowl. Be as close as you can to the required measurement. One gram over or under is okay. ZERO out the food scale.
- Next, add the water. ZERO out the food scales. Add the flour. ZERO out the food scale.
- Take the bowl off the food scale. (DO NOT ADD SALT YET).
- With your dominate hand, submerge your hand into the flour mixture and make swirling motions to incorporate the dough. This takes some time, so don't worry. Keep wiping your hand around the bowl and underneath to incorporate all the flour. If you hand gets too doughy, dip your other hand in water, then it's easier to get all the dough off your dominate hand.
- Once the flour is all incorporated, get a linen napkin or terry cloth towel totally wet, ring it completely out so it's just damp, drape it over the bowl, and let the dough rest for 20 minutes.
- When the timer goes off, it's time to add the salt with more water. Measure out the salt using your food scale, then sprinkle the salt all over the top of the dough. Fill a jar with water, the mouth of the jar should be wide enough for your hand (You will need to empty and rinse out the jar between each use). Take 2 scoops of water with your hand and pour them over the dough. Make sure both hands are wet, then work the dough to incorporate all of the salt. You want the salt totally dissolved, then you know you're done. If there's a few pieces of salt, it's okay. If the dough feels too dry, add a little more water to the dough. There is no exact measurement for this. It's something you just need to feel. With practice you will get there.
- The dough should now look like cheese curds. Put the damp towel over the bowl again, and set the timer for 20 minutes.
- After the timer goes off, it's now time to start your first round of STRETCH and FOLDS. There will be 4 rounds total of stretch and folds. These are quick and only require about 1 minute of your time.
- Make sure there is fresh water in your jar, then dip your dominate hand inside the water. No scooping water, just get it wet.
- With your wet hand, you are going to start on the NORTH end of the bowl and work counter clockwise. Take your hand and scoop up some dough on the North end, and fold it into the center of the dough. Continue doing this all the way around the bowl. Generally it takes 4-5 stretch and folds to complete the whole bowl.
- Once you have completed your first stretch and fold, set the timer for 40 minutes.
- You will repeat this process a total of 4 times. If your towel starts to dry out, you may get it wet again, ring it out, and place over the bowl.
- After the 4th stretch and fold let the dough rest again for 40 minutes.
- Now it's time to move on to PRE-SHAPING.
- First, we need to divide the dough. The dough itself should way around 2150 grams, give or take, minus the weight of your bowl. We need half of that. So roughly take 1070 grams of dough and place it on a floured surface. Use your bench scraper to help you.
- Starting from the North side, grab the dough and fold it into the center. Now take from the South side and fold that end of dough into the center. Now the sides, then the corners, always working from opposite sides.
- Make sure the underside is floured, but do not flour the top side, or the pieces of dough will not stick to each other.
- The goal now is to create tension on the under side. To do this you pick up the dough and place it on its side and tuck the dough under. Continue this process of tucking the dough all the way around. Now place the dough tucked side down, with the nice smooth side facing up.
- Use your hands to turn the down in a circle cupping the dough with your hands and tucking any loose ends under. (SEE VIDEO FOR A VISUAL)
- Repeat the process with the second half of the dough.
- Place the damp towel over the 2 dough balls and let them rest for 20 minutes.
- When the timer goes off, remove the towel. Using your bench scraper to assist you, and flip the dough over, so the smooth side is now facing down.
- It's time for the FINAL SHAPING, and we're almost done for the night!
- On the North side of the dough, fold down the top piece with your hands about 1/3 of the way down. We are going to now fishtail braid our bread. Take a piece from the left side and fold it into the center. Then, take a piece from the right side and overlap the first piece. Continue this process until you are down and the bottom.
- Lightly flour your hands at anytime if it gets sticky.
- Now it's time to take the bottom piece and fold it up about 1/4 of the way, and roll the dough like a cinnamon roll. I like to roll it tightly and stretch it long to fit nicely in my extra-long loaf pans.
- We use this bread for sandwiches, so I prefer zero big holes. So I roll the bread tightly.
- Now place your bread in your desired loaf pans. (If using metal pans, I recommend lining them with parchment paper.)
- Put your loaves into bread bags, tie them off, and place the loaves in the refrigerator over night. At least 10-12 hours.
- The next morning, pull out the loaves from the refrigerator.
- Preheat your oven to 500 degrees, and place a metal pan filled with water on the lower shelf of the oven.
- While your oven is preheating, you need to score the loaves of bread, or they will look like they exploded in the oven.
- Take a sharp knife, lame, or x-acto knife, dip in flour, then run the knife over the dough in a diagonal line to the bread. I make a top, middle, and bottom slit into the dough. If you don't run the knife over the whole width of the dough, it will bubble weird on the sides, so make sure to run it along the whole width. (There are several ways of doing this process, and many designs you can make. This is how I do it.)
- Once your oven is preheated, place your loaf pans in the oven and shut the door. Lower the oven temperature to 475 degrees, and set a timer for 20 minutes.
- When the timer goes off, lower the temperature to 450 degrees and bake an additional 20 minutes.
- When the timer goes off, pull the bread out of the oven and let it cool for 10 minutes before taking it out of the loaf pans. Allow the bread to completely cool on a wire rack for 4 hours.
- You will hear cracking sounds from the bread for a few minutes. Listen as it sings!
- Store bread in a bread bag on the counter for 3-4 days, or longer in the refrigerator. Sourdough bread freezes well too and will keep in the freezer for 2 months.
Notes
***If you want to make dinner size rolls instead of loaves, follow these instructions.
Yields: 17-18 dinner rolls
- After your 4th and final stretch and fold, cover the bowl with plastic wrap and place in the refrigerator for the night.
- The next morning, pull the bowl of dough out of the refrigerator and let it sit on the counter for about 1 hour.
- Preheat oven to 450 degrees (about 30 minutes before baking) with a baking dish filled with water on the lower rack.
- Using your bench scraper to take the dough out of the bowl and place it on either a cutting board or silicone mat.
- Measure out about 120g of dough on a kitchen scale, then shape into a dough ball.
- Follow the pre-shaping instructions to do this method.
- Tuck in the bottom to create tension on the top.
- Place each dough ball on a parchment lined cookie sheet about 3 inches apart from each dough ball.
- Cover with plastic wrap and let the dough balls rise for 30 minutes to 1 hour.
- Using a floured knife, slice small slits into the top of each piece of dough.
- Bake in a 450 degree oven for 30 minutes.